
PowerRename surprised me when I first discovered it.
I had a folder full of files I needed to clean up, and I was about to give up because renaming them one by one was a waste of time.
With PowerRename, it turned into a quick, repeatable workflow I still use today on my company laptop.
If you’ve ever needed to rename dozens (or hundreds) of files at work, you’ve probably run into the same two constraints I did: you can’t spend ages doing it manually, and you can’t (or shouldn’t) install random third-party tools on a company laptop.
In this guide, I’ll show the most common office-friendly renaming rules with copy-and-paste examples.
Key Takeaways
- Rename dozens of files directly from File Explorer with PowerRename.
- Preview every change before applying it.
- Use replacements, prefixes, dates, numbering, PDF-only rules, and extension changes.
- Add optional regex when simple Find and Replace is not enough.
In this article
PowerRename (PowerToys): a free batch rename tool for Windows
If you’ve ever needed to rename dozens (or hundreds) of files in a corporate environment, you’ve probably run into two problems:
- You don’t have time to rename everything one by one.
- You can’t (or shouldn’t) install random third-party tools on a work laptop.
PowerRename solves the “rename many files fast” problem with a safe, predictable workflow. It’s part of Microsoft PowerToys, and it acts like a batch rename tool (also called a bulk rename tool or mass rename tool): you define a rule (like find & replace, prefix/suffix, numbering), and it shows a preview before you apply the changes.
In other words: it’s a practical file renamer for Windows that’s fast enough for real work, and safe enough to use when your filenames actually matter (finance docs, contracts, invoices, exports, etc.).
How you get it (official download): install Microsoft PowerToys from the Microsoft Store (usually easiest) or via the official Microsoft PowerToys page (useful if your company blocks the Store). If you’re in a managed environment, follow your IT policy or ask for approval.
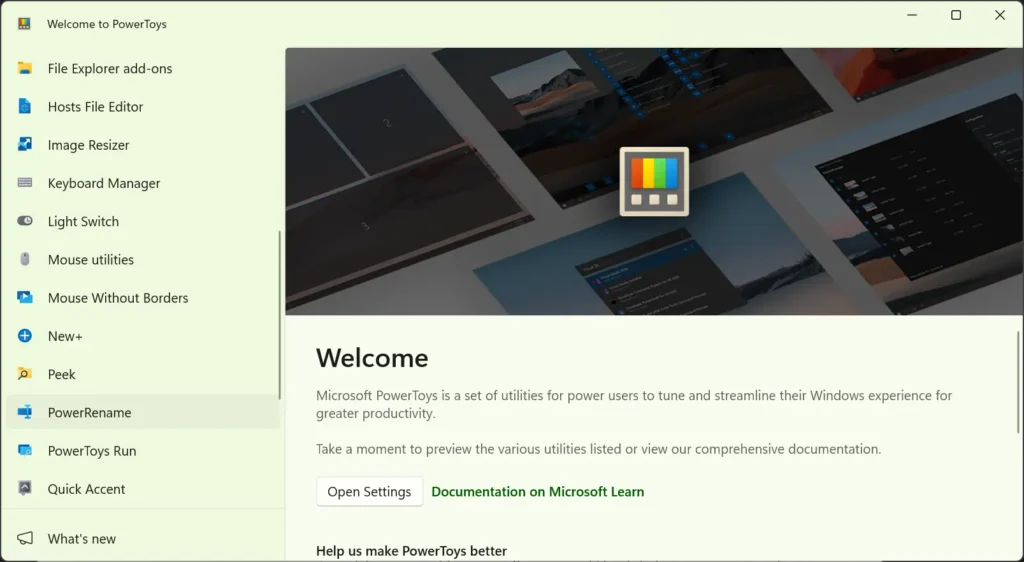
Once installed, PowerToys gives you a “control panel” with multiple utilities (PowerRename is just one of them). That’s helpful in a company setting: one approved Microsoft tool can solve several small productivity problems.
Why PowerRename fits corporate work: it integrates directly into File Explorer. You select files, right-click, open PowerRename, and you get a preview list that shows exactly what will change. This is the difference between a confident bulk rename and a risky “hope this works” operation.
After installing PowerToys, you’ll typically find PowerRename in the right-click menu of File Explorer.
In the next section, I’ll show the 30-second workflow and the most common renaming rules you’ll use at work (prefix/suffix, find & replace, numbering, PDFs only, and extension changes).
How to rename multiple files at once (the 30-second workflow)
If you need to rename multiple files at once on Windows at work, your biggest risk is not “how to do it”, it’s doing it wrong and having to fix a mess later. PowerRename is built for a safe workflow: you define a rule, you get a preview, and only then you apply changes.
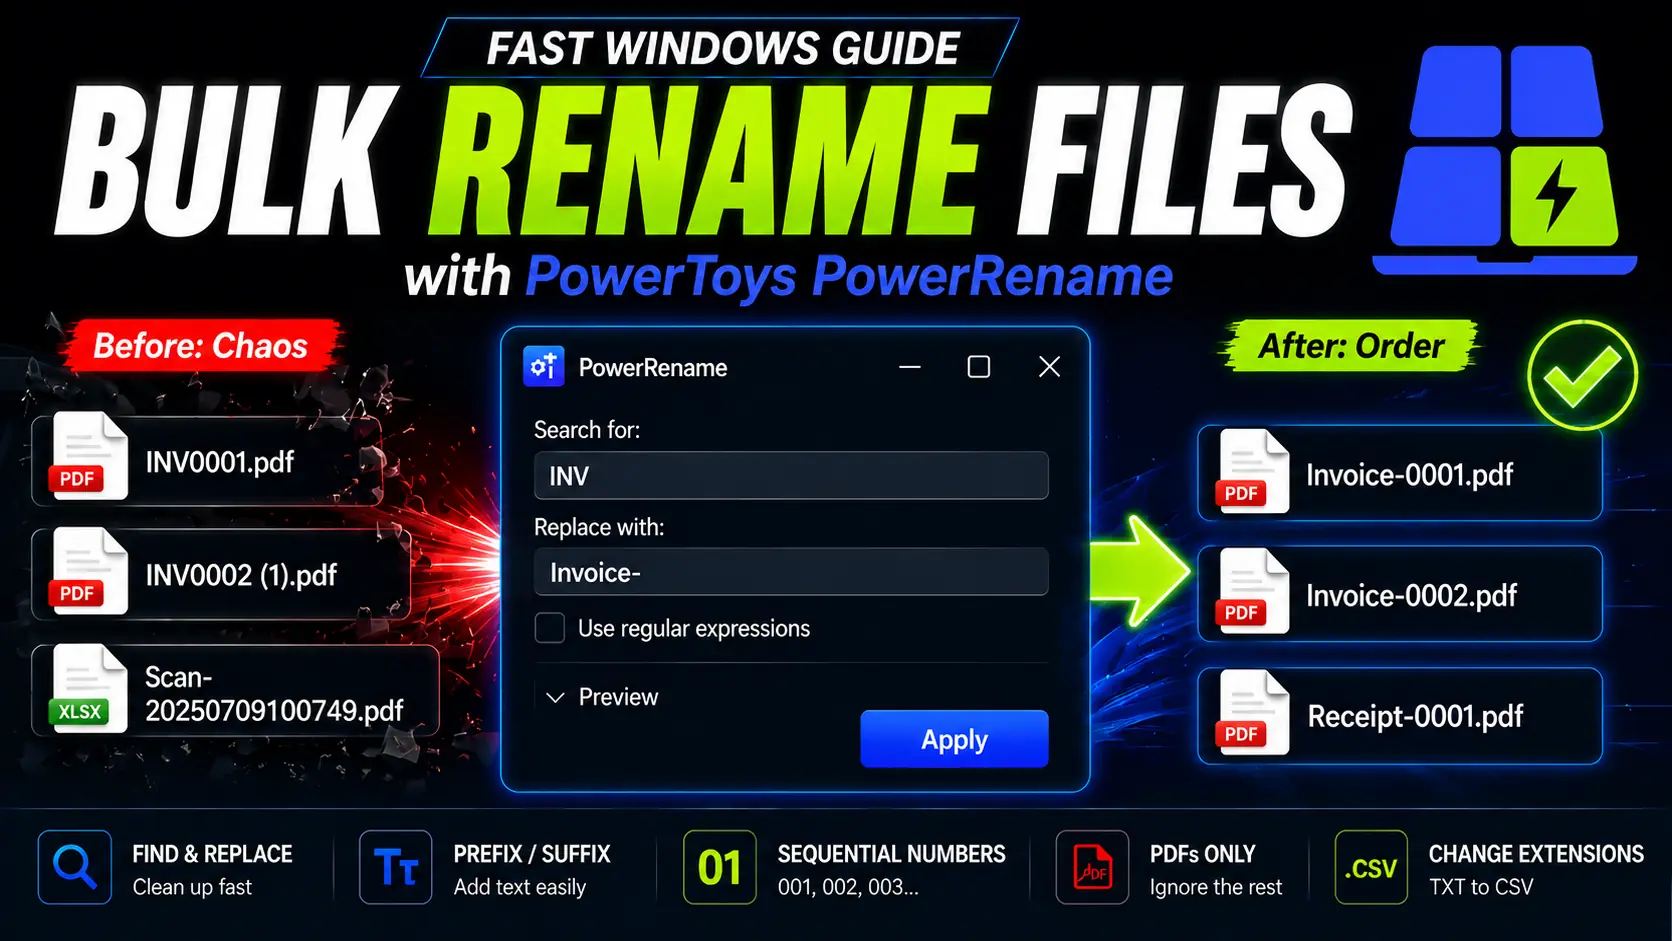
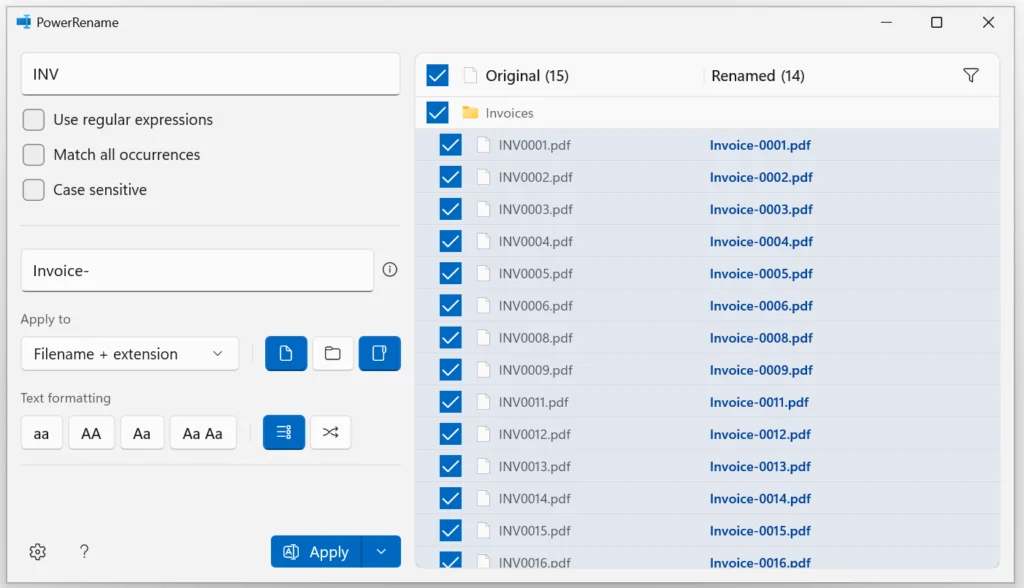
Typical corporate scenario: your accounting system exports invoice PDFs as INV0001.pdf, INV0002.pdf… but your team naming convention requires a clearer prefix like Invoice-0001.pdf. You want a fast batch rename without touching file contents.
Step 1 (10 seconds): Select files → right-click → open PowerRename
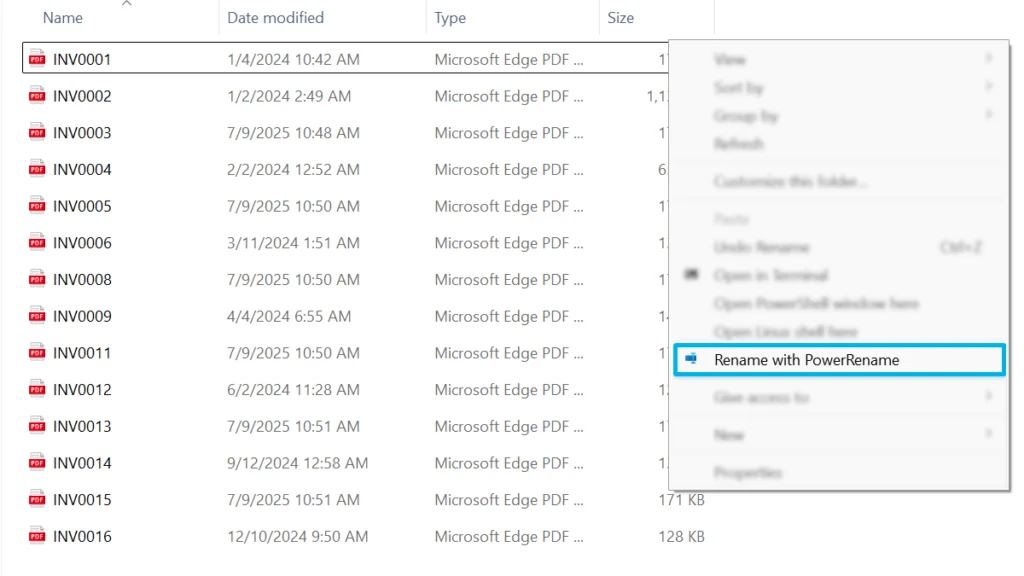
Select the files in File Explorer, then right-click and choose Rename with PowerRename. Alternatively, you can right-click the folder that contains the files to rename everything inside it. This opens the tool directly from Explorer, ideal on company laptops where you don’t want extra utilities running in the background.
Step 2 (10 seconds): Define the rule (Find & Replace) and check the preview
In PowerRename, you’ll typically start with Find & Replace. In this example, we’re standardizing invoice filenames by replacing INV with Invoice-.
- Search for:
INV - Replace with:
Invoice-
Important: treat the preview list as your safety net. Before you click Apply, it should show exactly what will change for every file.
Step 3 (10 seconds): Apply and Undo if you spot anything wrong
Once the preview looks correct, click Apply. If you immediately notice something wrong, use Undo in File Explorer (Ctrl+Z). In a corporate workflow, that “preview → apply → undo if needed” pattern is what makes bulk renaming safe.
30-second checklist: select files → open PowerRename → define rule → verify preview → Apply → Ctrl+Z if needed.
Next, we’ll go through the most common real-world rules.
Batch edit file names with Find & Replace (clean up naming fast)
In corporate folders, the most common bulk-renaming task is simple cleanup: fixing repeated tokens, standardizing naming, or removing Windows “copy suffixes” like (1) and (2). This is where Find & Replace shines: you define one rule, verify the preview, and apply it to dozens of files in seconds.
Typical scenario: you receive invoices or reports from different sources, and Windows adds (1), (2) when duplicates exist. The filenames become harder to scan, search, and share. You want clean names again.

Example: remove the “ (1) / (2)” suffix from duplicate filenames
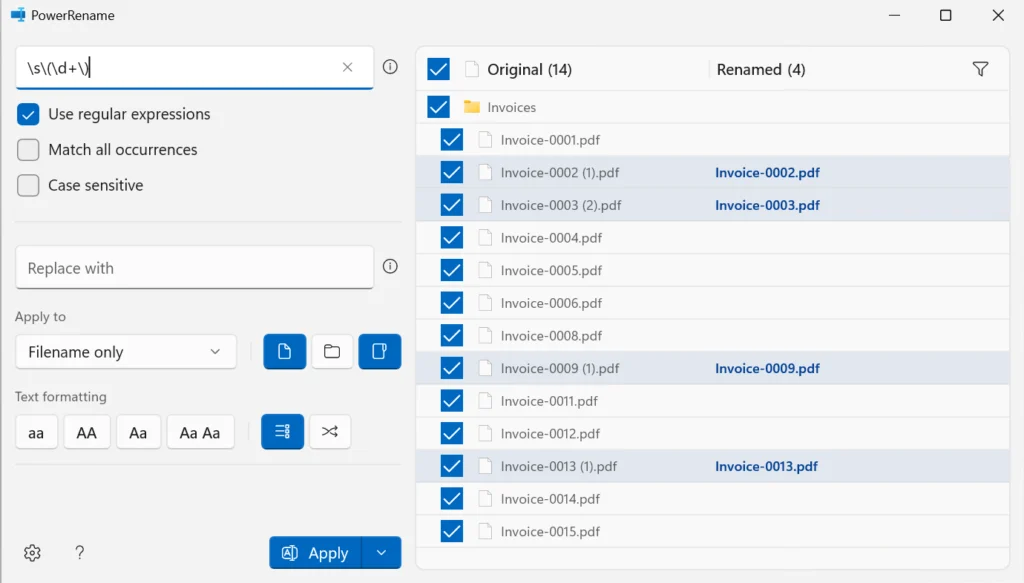
We’ll remove the “copy suffix” that Windows appends to duplicates. A simple Find & Replace can work in many cases, but a short regex makes it safer and more flexible because it removes any number: (1), (2), (12), etc.
- Enable: Use regular expressions
- Search for (regex):
\s\(\d+\) - Replace with: (leave empty)
- Apply to: Filename only (recommended here)
What this regex means (in plain English): remove a space (\s) followed by a number in parentheses, like (1). Because we’re applying it to the filename only, the file extension remains untouched.
Other fast cleanup ideas (same workflow): replace spaces with dashes, remove “FINAL” tokens, fix common typos, or standardize abbreviations. The key is always the same: define one rule → verify preview → apply.
Add a prefix or suffix to multiple file names (incl. date stamps)
Adding a prefix or suffix is one of the fastest ways to make filenames “work-ready” in a company environment. It helps you instantly communicate status (DRAFT_, FINAL_, SIGNED_), destination (PRINT_), or context (ClientA_, ProjectX_) across dozens of files without opening them one by one.
This is especially useful when you’re sharing files with a team: consistent prefixes/suffixes make folders easier to scan, search, and sort.
Example 1: add a simple prefix to multiple files
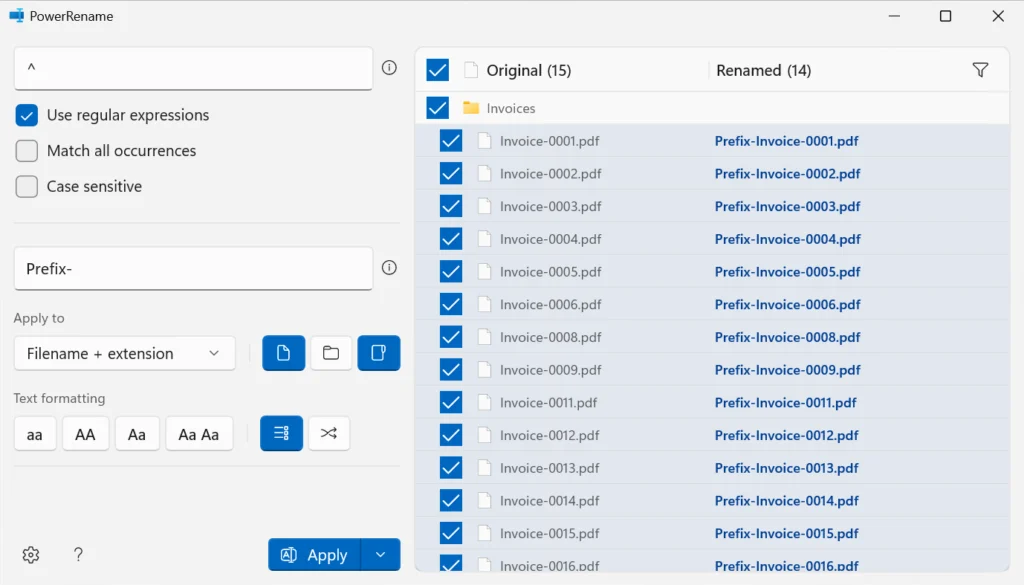
Let’s start with the simplest case: add a fixed prefix to every selected file. In the example below, we add Prefix- to a set of invoice PDFs.
- Search for:
^ - Replace with:
Prefix- - Apply to: Filename + extension (fine here)
Why ^? It’s a regex anchor that means “start of the filename”. So you’re telling PowerRename: “insert this text at the beginning”. If you don’t care about regex, you can just follow the recipe and rely on the preview.
Example 2: add a date stamp prefix (YYYY-MM) from file metadata
In real workflows, a date stamp is even more useful than a generic prefix, especially for invoices, scans, exports, and monthly reporting. PowerRename can generate date parts from metadata and insert them into filenames.
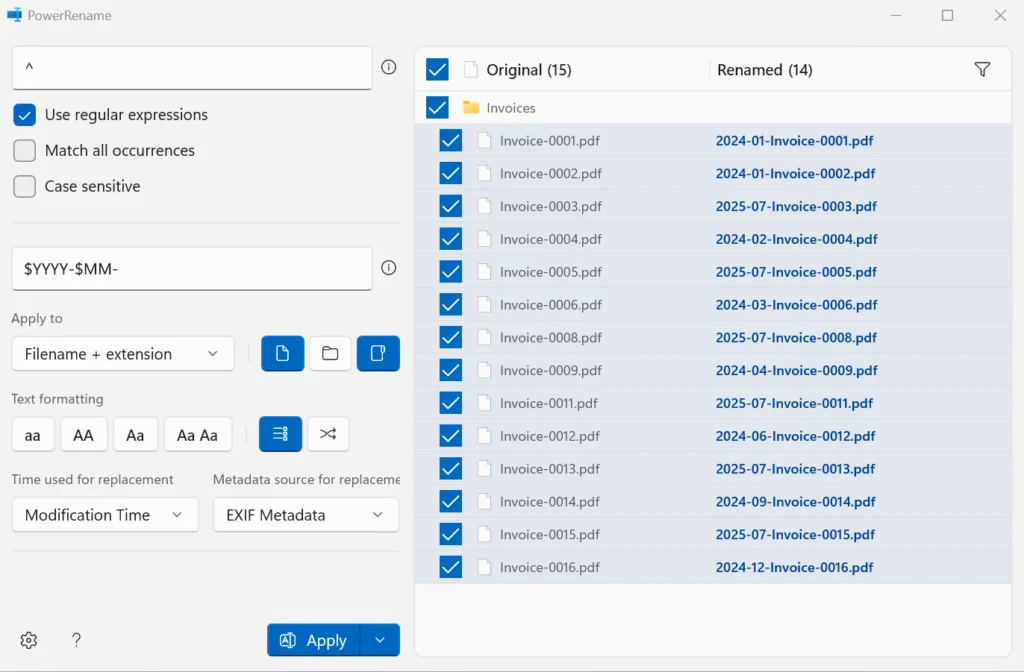
In the example below, we add a YYYY-MM- prefix so files naturally group by month when sorted by name:
- Replace with:
$YYYY-$MM- - Time used for replacement: choose the most reliable source for your case (e.g., Modification Time for invoices you received/edited recently, or another timestamp if needed).
- Apply to: Filename + extension
Tip: If you want the filename to reflect the actual document date (not when it was modified), make sure you pick the right metadata source. For office documents and PDFs, “Modification Time” is often the most predictable. For photos, the most accurate “when it was taken” date is often stored in the camera’s EXIF data, so that may be the better choice.
Rename multiple files with sequential numbers (001, 002, 003…)
Sequential numbers are useful when you want clean, predictable filenames that sort correctly in Windows. This is common with scanned documents and receipts because many scanners generate long timestamp-based names that are hard to read and awkward to share.
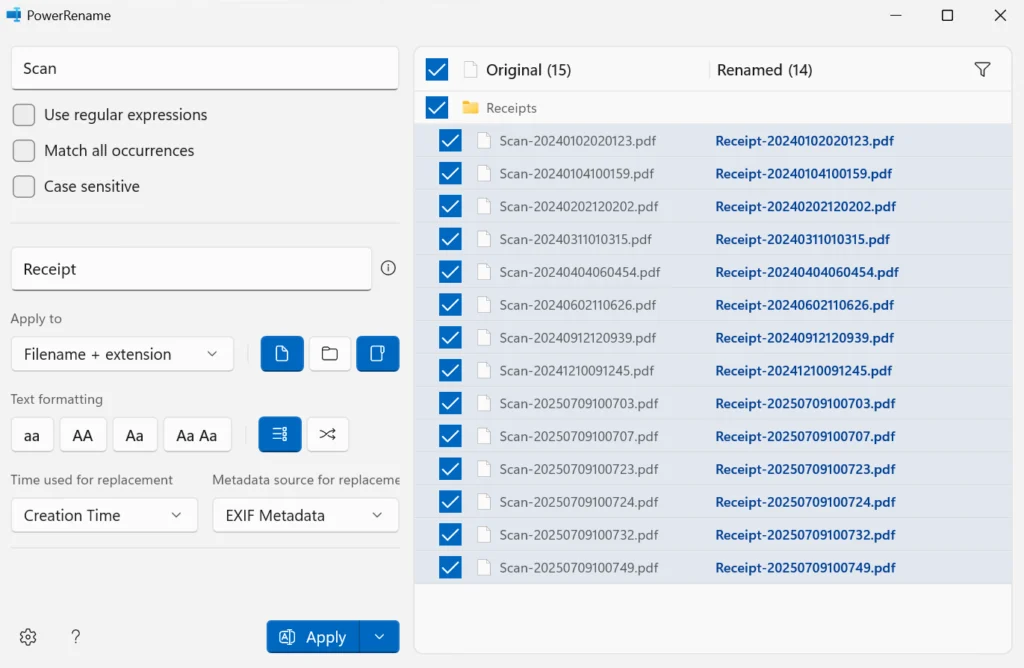
Example scenario: your scanner creates files like Scan-20250709100749.pdf. You want a consistent naming convention like Receipt-0001.pdf, Receipt-0002.pdf, Receipt-0003.pdf.
We will do this in two quick steps: first standardize the text prefix, then replace the long number with a sequential counter.
Step 1: Replace the scanner prefix (Scan → Receipt)
Start by making the filename prefix consistent. This is a simple Find and Replace operation.
- Search for:
Scan - Replace with:
Receipt - Apply to: Filename + extension
Verify the preview shows Scan-... becoming Receipt-... for every file you selected.
Step 2: Replace the long number with sequential numbering (0001, 0002, 0003)
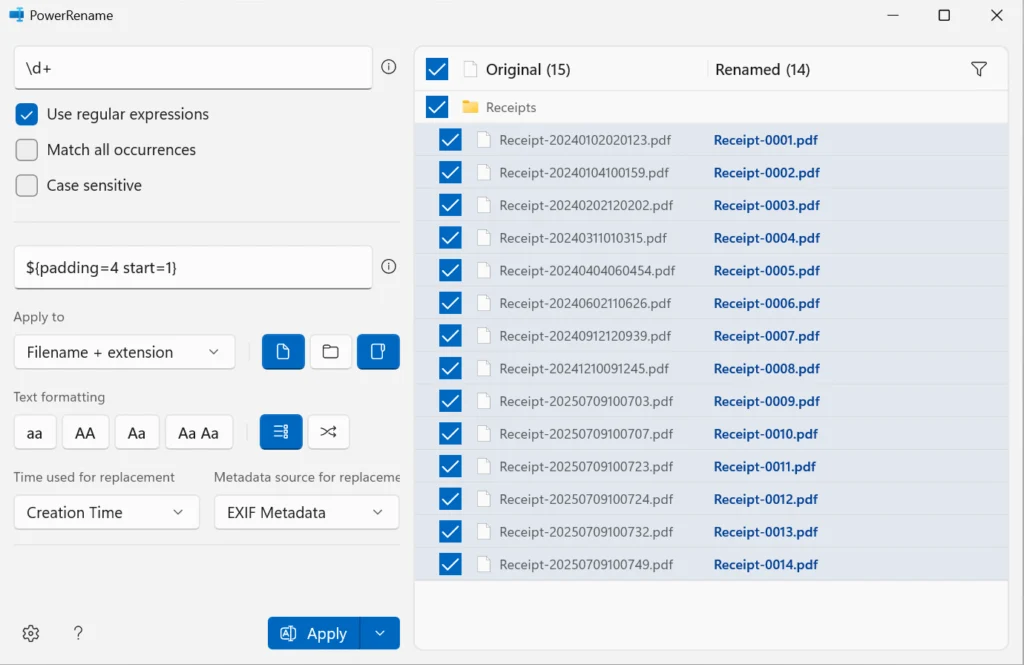
Now that the prefix is consistent, replace the long scanner number with a clean sequence. The key idea is: match the numeric part, then replace it with an auto-incrementing counter with padding.
- Enable: Use regular expressions
- Search for (regex):
\d+ - Replace with:
${padding=4 start=1} - Apply to: Filename + extension
Why padding matters: Windows sorts file names alphabetically, not numerically. Without padding, 10 comes before 2 (because “1” is less than “2”). With padding, 02 stays before 10, keeping your files in the correct chronological order.
In the preview, you should see names like Receipt-20250709100749.pdf become Receipt-0001.pdf, Receipt-0002.pdf, and so on.
Bulk rename PDF files (rename only PDFs, ignore the rest)
Mixed folders are common at work. For example, you might have invoice PDFs plus Excel source files in the same place. In those cases, you often want to rename PDFs only and leave everything else untouched.
You have two safe options:
- Option A (no regex): filter or select only PDFs in File Explorer, then run PowerRename on that selection.
- Option B (regex inside PowerRename): run PowerRename on the whole selection but apply the rename rule only to files that end with
.pdf.
Example: add a prefix to PDF files only (ignore other file types)
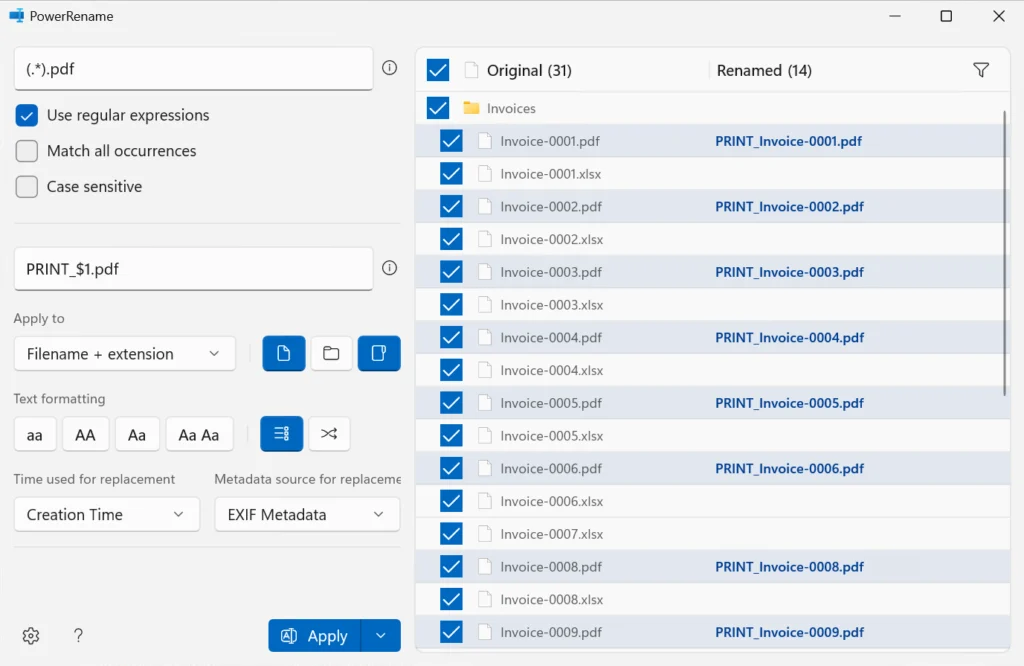
In this example, we add PRINT_ to PDF invoices only. Excel files in the same folder stay unchanged.
- Enable: Use regular expressions
- Search for (regex):
(.*)\.pdf - Replace with:
PRINT_$1.pdf - Apply to: Filename + extension
How it works: (.*)\.pdf matches only PDF filenames. The (.*) part is the first capture group, it stores the filename text before .pdf. In the replacement, $1 inserts whatever that first set of parentheses captured, so you keep the original name and just add PRINT_ in front. If your regex has more capture groups, you can reuse them as $2, $3, and so on.
Change file extensions in bulk (extension-only mode + warnings)
Sometimes the useful change is not the filename, it is the file extension. A common case is when a system exports data as .txt, but the files are actually comma separated values and should be .csv. PowerRename includes an Extension only mode, which changes only the extension and leaves the filename untouched.
Example: change .txt to .csv in one step
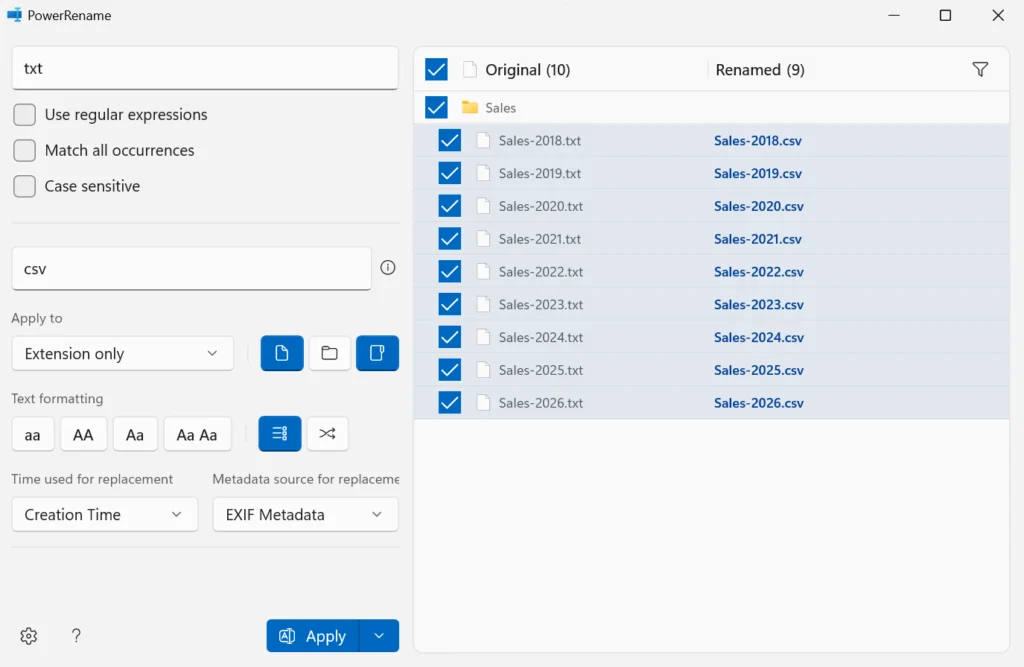
- Search for:
txt - Replace with:
csv - Apply to: Extension only
With Extension only selected, PowerRename will keep the original filename and change only the ending. The preview should show results like Sales-2018.txt becoming Sales-2018.csv.
Warnings before you click Apply:
- Changing an extension does not convert the file. It only changes the label Windows uses. If the content is not really CSV, the file may open incorrectly.
- Do a quick spot check. Open one or two files first and confirm the content matches the extension you plan to use.
- Be careful with “dangerous” mismatches. For example, renaming
.exe,.bat,.ps1or other executable extensions can create security risks and policy issues in company environments. - Use the preview list. Verify that only the intended files will change. If you see unexpected files in the list, stop and adjust your selection.
- Undo is available. If you apply and immediately notice a problem, use Ctrl+Z in File Explorer.
Rename all files in a folder (and optionally subfolders) + bulk folder rename
Sometimes you do not want to rename a few files. You want to clean up an entire directory structure, including files and folder names. This is common in shared company drives where naming is inconsistent across teams and projects.
Example goal: normalize names so they use a single separator, a hyphen. This cleans up messy patterns like double spaces, underscores, or “space hyphen space”.
Step 1: Normalize separators across files and folders
Open PowerRename from the parent folder, then make sure you include folders (and optionally subfolders) in the selection. In this step, we replace any run of spaces, underscores, or hyphens with a single hyphen.
- Enable: Use regular expressions
- Enable: Match all occurrences
- Search for (regex):
[\s\-_]+ - Replace with:
- - Apply to: Filename + extension
- Scope: include folders, and include subfolders if you want the whole tree cleaned
What this does: it collapses any sequence of separators into one hyphen. For example, Project Plan - AdventureWorks becomes Project-Plan-AdventureWorks, and folder names like Legal - Contracts become Legal-Contracts.
![Screenshot of PowerRename replacing all instances of spaces, underscores, and hyphens with a single dash using the regex '[\s-_]+'. The preview shows folder and filenames being consolidated into a dash-separated format.](https://turbotasking.com/wp-content/uploads/2026/01/powertoys-powerrename-regex-bulk-separator-normalization-1024x502.webp)
Step 2: Remove unwanted hyphens at the start or end
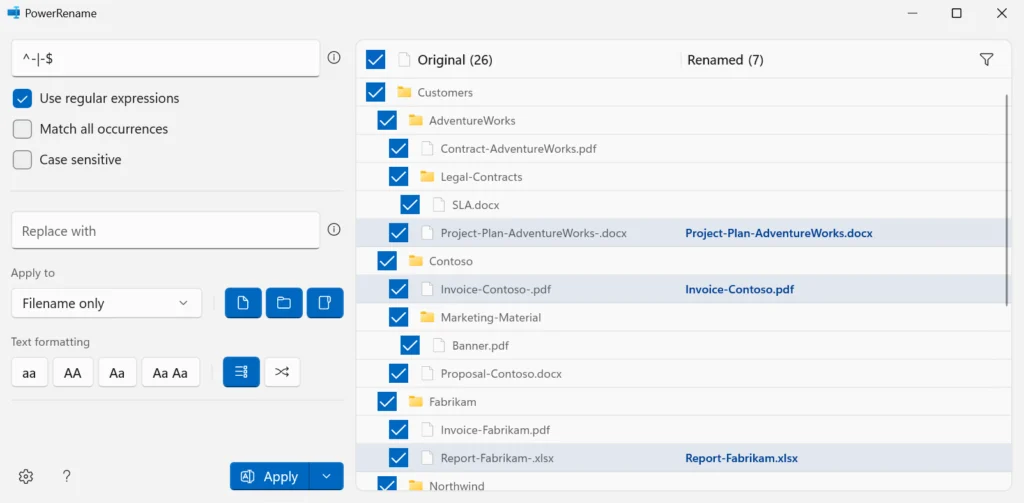
After step 1, you may see names that end with a hyphen right before the extension, for example Invoice-Contoso-.pdf. This happens when there is a separator right before the dot. Fix it with a quick cleanup pass.
- Enable: Use regular expressions
- Search for (regex):
^-|-$ - Replace with: leave empty
- Apply to: Filename only
Tip: Using Filename only avoids touching the extension. The preview should show names like Invoice-Contoso-.pdf becoming Invoice-Contoso.pdf.
Tip: Using Filename only avoids touching the extension. The regex ^-|-$ matches a hyphen at the start of the name (^-) or at the end of the name (-$), and replacing it with nothing removes those stray hyphens.
Safety note for company folders: test on a small subfolder first, and always rely on the preview. Bulk renaming across subfolders can touch a lot of files quickly.
Basic safety checklist (preview, exclude, undo)
Bulk renaming is fast, which also means mistakes can scale fast. Use this short checklist before you click Apply.
- Always check the preview first. Scan a few random rows and confirm the “Renamed” column matches what you want.
- Test on a small sample first. Try your rule on a small subfolder or a handful of files, then repeat it on the full set once the result is correct.
- For high risk renames, keep a quick backup. Duplicate the folder first, then rename the original. Restoring a backup is usually simpler than renaming a copy and replacing the original later.
- Double check what will change. In the Apply to section, confirm you are editing the right part: Filename only, Filename + extension, or Extension only.
- Exclude anything you are unsure about. If a file looks risky, uncheck it and rename the rest. You can handle edge cases later.
- Chain renames in the right order: specific first, general second. Example: replace
presaleswithcampaignbefore replacingsaleswithrevenue, otherwisepresalesbecomesprerevenueand the other rule will not match anymore. - Be careful with folders and subfolders. Renaming across subfolders can touch a lot of files. Test your rule on a small folder first.
- Watch for unintended matches. With regex enabled, a broad pattern can rename more than you expect. Tighten the pattern if the preview looks too “wide”.
- Keep extensions safe. Avoid changing extensions unless you are certain about the file type. Renaming an extension does not convert the file.
- Know how to undo. If you apply and notice a mistake immediately, go back to File Explorer and press Ctrl+Z.
If you follow these steps, you can rename large batches confidently without turning a quick cleanup into a recovery task.
Final thoughts
PowerRename is one of those small Windows tools that can quietly remove a lot of manual work. Once you understand the basic pattern, select files, define a rule, check the preview, and apply, you can reuse it for many common office tasks.
For simple cases, Find and Replace is often enough. For more flexible cleanups, regex, metadata, and sequential numbering make PowerRename much more powerful. The important habit is to treat the preview as part of the workflow, not as an optional extra.
Official reference: PowerToys PowerRename (Microsoft Learn).
If you want to get more out of the advanced examples, learning basic regex helps a lot. Check out the free interactive lessons at RegexOne.com.
You are interested to see other ways to use Microsoft PowerToys for office productivity, check the following article:

Want more practical Windows productivity tips? If you like simple ways to make everyday work faster, I share more practical Windows productivity tricks in the TurboTasking newsletter.