
You see text on your screen.
It might be inside a screenshot, scanned PDF, presentation slide, paused video, browser image, or old business app where normal copy and paste does not work.
You can read it, but you cannot select it.
So the question is:
What is the fastest way to copy text from an image on Windows without retyping it?
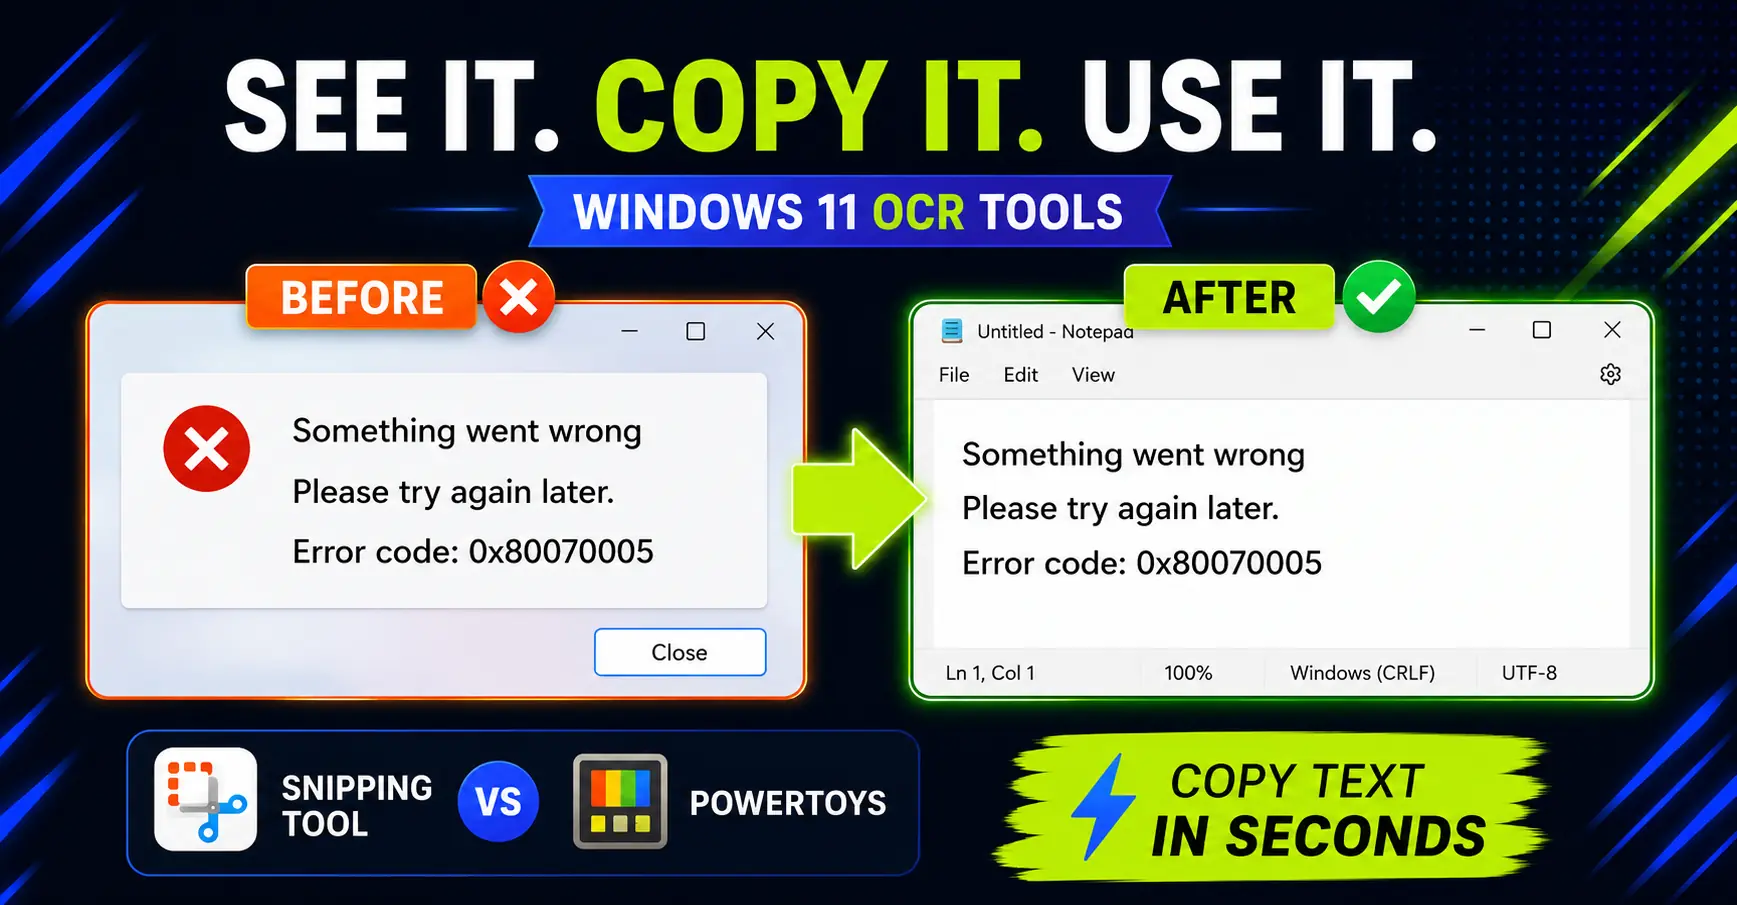
For most Windows 11 users, I would start with Snipping Tool Text Extractor. It gives you more control after OCR because you can select the specific text you want to copy.
PowerToys Text Extractor is still useful if you want the fastest direct shortcut: select an area, send the recognized text to the clipboard, and paste it somewhere else.
Both tools work with text that is visible on your screen. The source does not need to be a saved image file. If the text is visible in a program, website, video, screenshot, or PDF viewer, one of these tools may be able to extract it.
Key Takeaways
- Snipping Tool gives you more control over which detected text you copy.
- PowerToys Text Extractor is faster when the text area is clean and isolated.
- Both tools can extract text from anything visible on your Windows screen.
- Check the OCR language and review the result before using important text.
- Use local Windows OCR tools instead of uploading sensitive screenshots online.
The quick answer
Use Snipping Tool when you want control.
Use PowerToys Text Extractor when you want speed.
The key difference is the workflow:
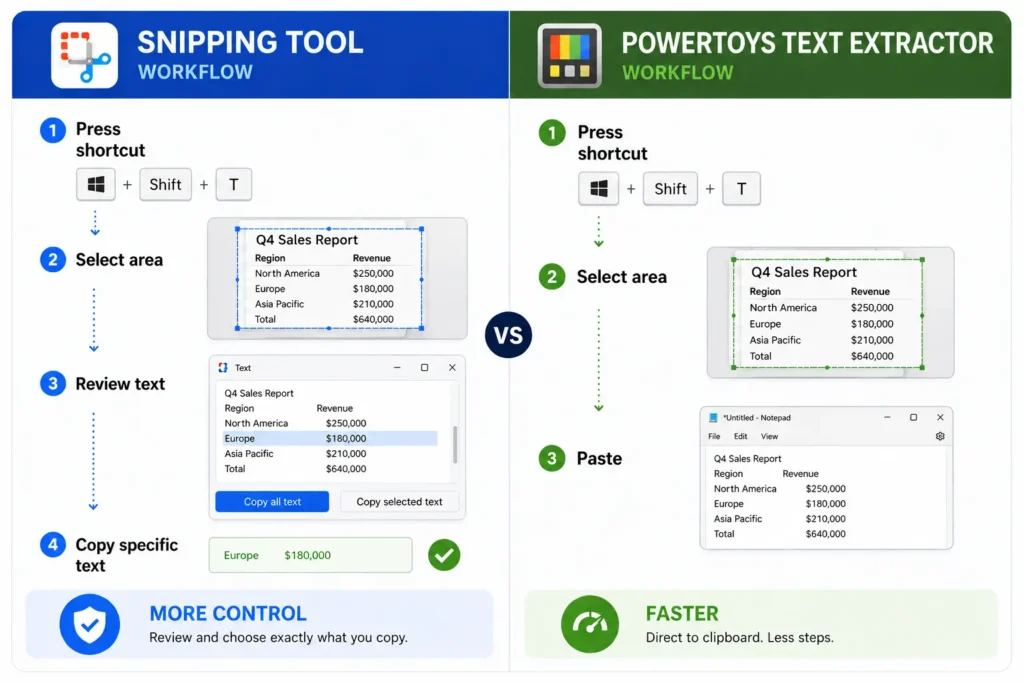
- Snipping Tool: select a screen area, review the detected text, then choose what to copy.
- PowerToys: select a screen area, and the detected text is copied directly to your clipboard.
That makes Snipping Tool more flexible and PowerToys more direct.
Option 1: Use Snipping Tool Text Extractor
On my current Windows setup, Win + Shift + T opens the Snipping Tool text extraction mode directly.
This is different from Win + Shift + S, which opens the normal Snipping Tool capture bar for screenshots. The Text Extractor shortcut is the one I care about here because the goal is not to save a screenshot. The goal is to copy text from the screen.
Basic workflow:
- Press Win + Shift + T.
- Select the part of the screen that contains the text.
- Review the detected text.
- Select the specific text you need, or use Copy all text.
- Paste it with Ctrl + V.
If Win + Shift + T does not open Text Extractor on your PC, try opening Snipping Tool with Win + Shift + S and look for the Text Extractor or Text actions button. This feature depends on your Windows and Snipping Tool version.
Snipping Tool is especially useful when the selected area contains several different text blocks. For example, a screenshot might include a window title, a menu, an error message, a sidebar, and a footer. With Snipping Tool, you can interact with the detected text and copy only the line you actually need.
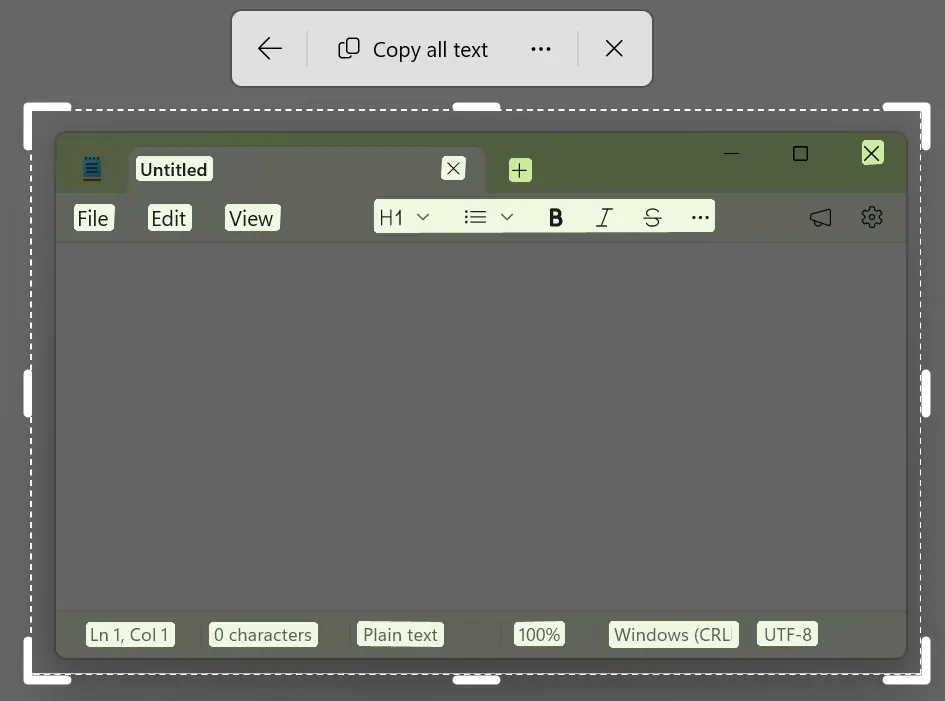
This makes Snipping Tool more than a screenshot app. With Text actions, you can capture an area, let Windows detect the text, copy only the part you need, or copy everything at once. It can also redact email addresses and phone numbers, and Microsoft documents the recognition as local on-device processing.
Option 2: Use PowerToys Text Extractor
PowerToys Text Extractor is the faster option when you do not need to review or select detected text inside a capture window.
The default shortcut is also:
Win + Shift + T
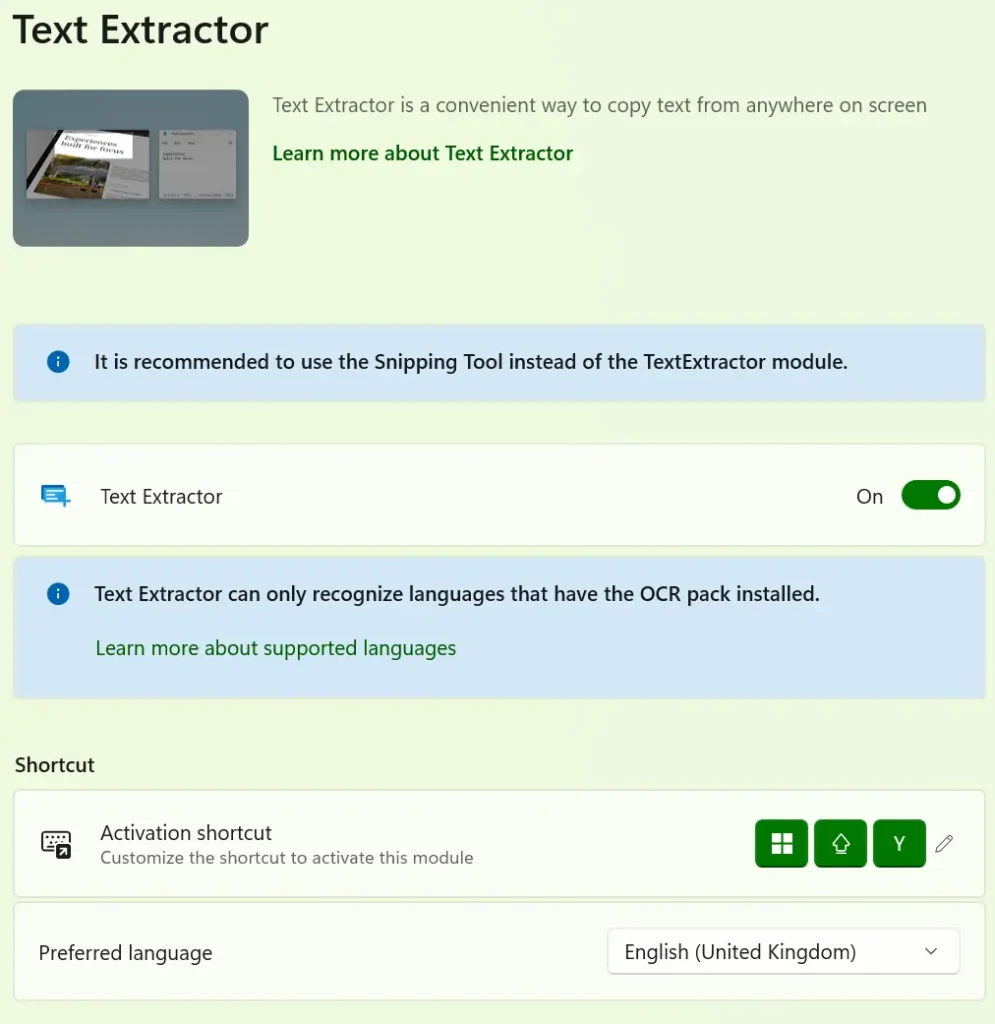
Because Snipping Tool may now use the same shortcut, you may want to change the PowerToys shortcut. I currently use Win + Shift + Y for PowerToys so it does not conflict with Snipping Tool.
Basic workflow:
- Open the image, PDF, video, website, or app window that contains the text.
- Press your PowerToys Text Extractor shortcut.
- Drag around the text you want to extract.
- Release the mouse button.
- Paste the result with Ctrl + V.
That is the main advantage: shortcut, select, paste.
You do not open a screenshot editor. You do not click Text actions. You do not choose text after OCR. PowerToys copies the recognized text directly to your clipboard.
That is great when the text is clean, isolated, and easy to select. It is less ideal when the selected area contains extra text you do not want.
PowerToys Text Extractor is the more direct tool: it is designed to copy text from anywhere on your Windows screen, including text inside images, videos, apps, PDFs, or browser windows. The tradeoff is that it sends the OCR result straight to your clipboard, so it works best when the text area is clean and you already know exactly what you want to capture.
There is also a useful clue in the PowerToys settings: Microsoft now points users toward Snipping Tool for screenshot-based text extraction. That does not make PowerToys Text Extractor useless. It just means I would treat it as the faster shortcut, not necessarily the most flexible screenshot OCR workflow.
Which tool should you use?
Both tools can extract text from anything visible on your screen. The real difference is the workflow.
Snipping Tool is usually better when you want more control after OCR.
- A screenshot with several text areas: copy only the specific text you need.
- An error message inside a larger window: avoid copying unrelated UI text.
- A scanned PDF: select only one paragraph instead of the entire page.
- A presentation slide: ignore titles, footers, or labels you do not need.
- Any messy screenshot: review the detected text before copying.
The extra review step is the main advantage. You can interact with the detected text instead of immediately accepting the OCR result.
PowerToys Text Extractor is usually better when speed matters more than control.
- A single error message: shortcut, select, paste.
- A short reference number: no need to open a screenshot window.
- A line from a paused video: grab the text quickly and continue.
- A small text block: copy it directly to the clipboard.
- An old business app: extract text where normal selection does not work.
If the text is clean and isolated, PowerToys often feels faster. If the screen region is busy or contains several text blocks, Snipping Tool is usually easier to control.
Should you use both tools?
You can keep both workflows if you use screen OCR often.
- Win + Shift + T for Snipping Tool Text Extractor when you want control.
- Win + Shift + Y, or another custom shortcut, for PowerToys Text Extractor when you want speed.
If you work with screenshots, PDFs, slides, videos, or internal tools every day, keeping both workflows available can actually make sense.
For most people, I would start with Snipping Tool. If you keep wishing the text went straight to your clipboard, add PowerToys Text Extractor as the faster shortcut.
Do not forget the OCR language
If OCR gives you strange results, the problem may not be the tool. It may be the language.
In PowerToys Text Extractor, check the Preferred language setting. Microsoft says Text Extractor can only recognize languages that have the OCR language pack installed, and the default language is based on your Windows system language and keyboard settings.
In Snipping Tool, I could not find a separate OCR language selector in Microsoft’s Snipping Tool documentation. In practice, I would treat it as a Windows OCR feature rather than a per-tool language setting. If recognition is bad in another language, check your Windows language settings and installed language features. If you need to force a specific OCR language, PowerToys gives you more visible control.
Good office use cases
This is not just useful for saved image files. The text only needs to be visible on your screen.
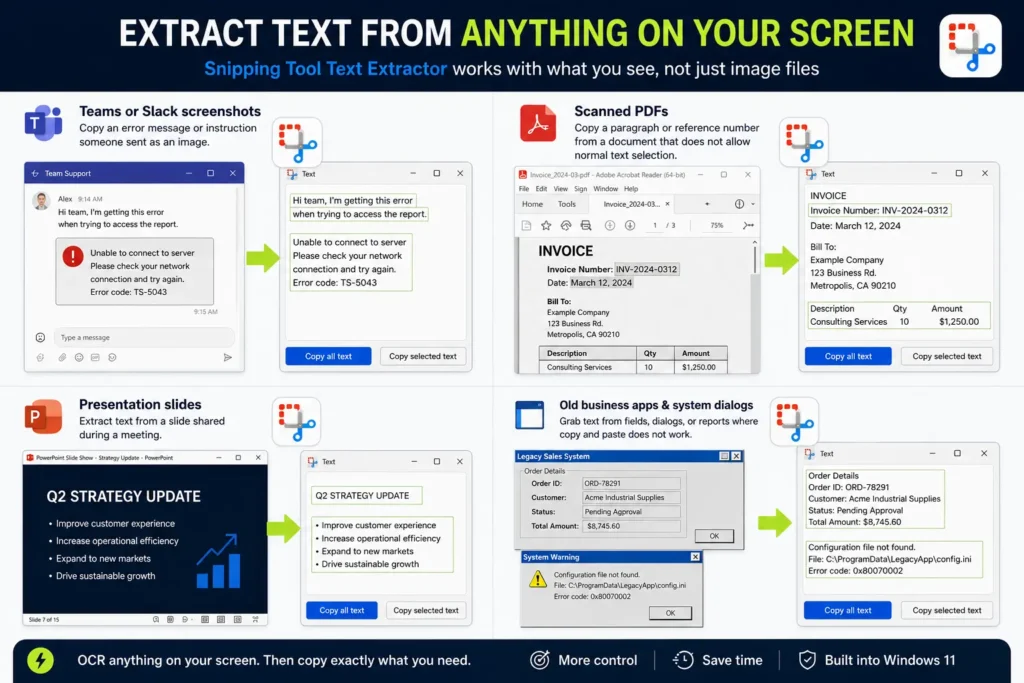
- Teams or Slack screenshots: copy an error message or instruction someone sent as an image.
- Scanned PDFs: copy a paragraph or reference number from a document that does not allow normal text selection.
- Presentation slides: extract text from a slide shared during a meeting.
- Old business apps: grab text from fields, dialogs, or reports where copy and paste does not work.
- System dialogs: copy error codes, file paths, warnings, and technical messages.
Avoid online OCR tools for sensitive screenshots
There are many websites where you can upload an image and get text back.
For personal, non sensitive images, that may be fine.
For work, I would be careful.
A screenshot can contain more than the text you are trying to copy: customer names, internal URLs, email addresses, project codes, prices, file paths, system names, or confidential context in the background.
That is why I prefer local Windows tools for this job.
If Snipping Tool does the job, use it. If PowerToys Text Extractor does the job and is allowed on your laptop, use it. But do not upload work screenshots to random OCR websites just to save a few seconds.
Common OCR problems
OCR is useful, but it is not perfect.
Before you paste extracted text into an email, report, ticket, or customer message, check it quickly.
- Handwriting: handwritten notes are still difficult for OCR to process accurately.
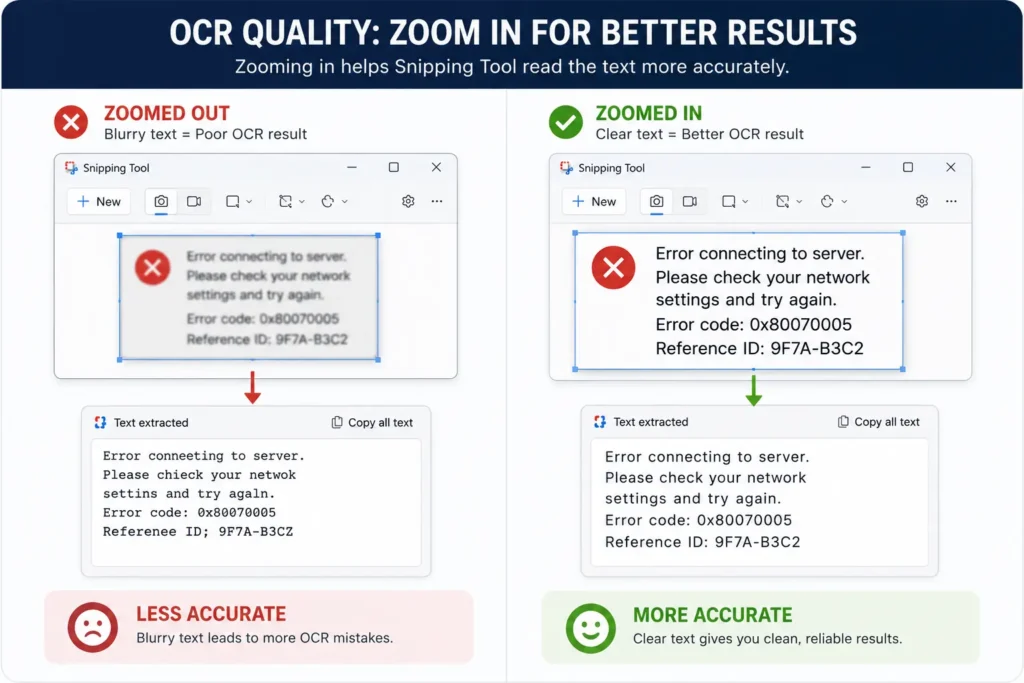
- Small text: zoom in before extracting if possible.
- Blurry screenshots: OCR accuracy drops when the image is unclear.
- Low contrast: light text on a noisy background can produce mistakes.
- Unusual fonts: stylized text may be recognized incorrectly.
- Tables: OCR may copy the text but not preserve the structure.
- Line breaks: pasted text may need cleanup.
- Wrong language: check the OCR language, especially in PowerToys.
A quick trick: if the result is bad, zoom in on the source and try again. Bigger, sharper text usually gives OCR a better chance.
My recommendation
If I were setting this up from scratch today, I would start with Snipping Tool Text Extractor.
It is built into Windows 11, it gives you more control after OCR, and it is especially useful when you want to copy only one specific part of a screenshot or screen region.
But I would keep PowerToys Text Extractor available with a different shortcut.
If the text is clean and isolated, PowerToys is faster. If the screen region is messy, Snipping Tool is safer.
The simplest rule is this:
Use Snipping Tool when you want control. Use PowerToys Text Extractor when you want speed.
Either way, do not retype text from images manually unless you have to.
Quick recap
- Snipping Tool is usually better when you want to select a screen region and choose which detected text to copy.
- PowerToys Text Extractor is usually faster when you want the extracted text copied directly to your clipboard.
- Both tools work with visible screen content, not only saved image files.
- Check the OCR language if the extracted text looks wrong, especially in multilingual work.
- Use local tools instead of online OCR websites for sensitive office screenshots.
- Always check OCR output before using it in important work.
You are interested to see other ways to use Microsoft PowerToys for office productivity, check the following article:
Want more practical Windows productivity tips? If you like simple ways to make everyday work faster, I share more practical Windows productivity tricks in the TurboTasking newsletter.